
TL;DR
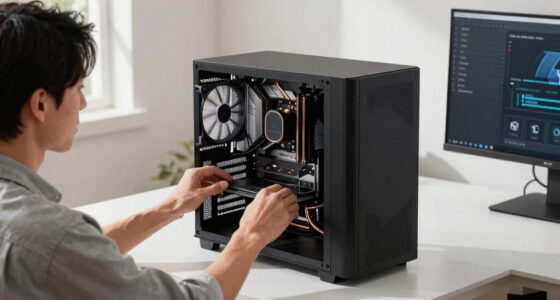
A closet can serve as a surprisingly good recording space if you focus on strategic placement, effective acoustic dampening, and ensuring it stays cool. Proper sealing, absorption, and ventilation are key to sound quality and equipment longevity.
Ever tried recording vocals or streaming in a tiny closet? It’s a mixed bag. On one hand, the small space limits echo, but on the other, it can turn into a bass trap, bouncing low frequencies around and causing muddiness.
This article is your go-to guide for turning a cramped closet into a mini studio or voice booth. You’ll learn how placement matters more than endless foam, how to keep your gear cool, and the secrets to making the space sound professional without breaking the bank.
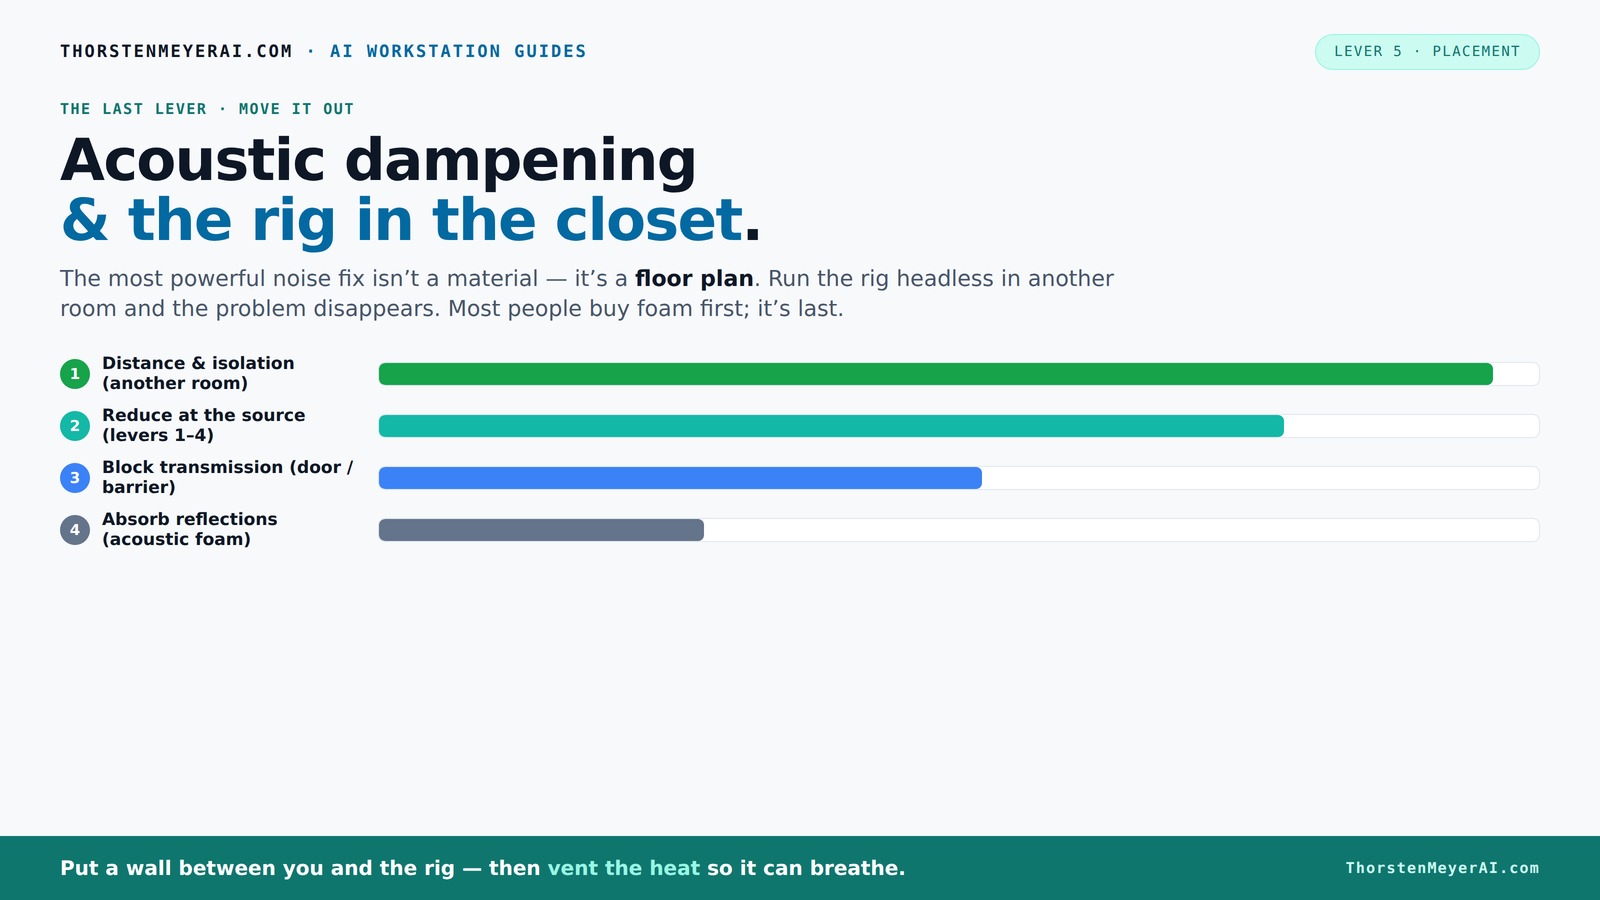
Acoustic dampening
& the rig in the closet.
The most powerful noise fix isn’t a material — it’s a floor plan. A rig you can’t hear because it’s in another room beats any amount of foam. Tap the approaches in Part 1 to see what actually works.
(another room)
(levers 1–4)
(door / barrier)
(acoustic foam)
Contain the noise, not the heat
Key Takeaways
- Prioritize placement and distance over adding foam — move your gear or yourself away from reflective surfaces.
- Use thick, dense materials like blankets and bass traps in corners and at reflection points for effective damping.
- Seal gaps around the door and vents to prevent sound leakage and maintain acoustic integrity.
- Treat floors and ceilings with rugs, foam tiles, or hanging panels to tame flutter echo.
- Ensure proper ventilation—use quiet fans or ducting—to keep your closet cool without sacrificing silence.

Focusound 52 Pack Acoustic Foam Panels 1" x 12" x 12" Sound Proof Foam Panles Soundproofing Noise Cancelling Wedge Panels for Home Office Recoding Studio with 300PCS Double-Side Adhesive
Soundproofing - Acoustic foam panels triangular grooves structure for better noise absorption, helps to reduce and absorb unwanted...
As an affiliate, we earn on qualifying purchases.
As an affiliate, we earn on qualifying purchases.
Why Placement Beats Foam Every Time in Small Spaces
Moving your microphone or speaker away from reflective surfaces reduces echo more than dozens of foam panels. Think of it like standing next to a speaker — distance makes the sound quieter and clearer.
For example, placing your mic 12 inches away from a wall with a small shield or using a reflection filter can cut unwanted reflections by over 50%. This is why the best first step is to position your gear and yourself thoughtfully before buying any treatment.
In a tiny closet, the key is to keep your voice or instrument centered and avoid pointing directly at hard surfaces like walls, shelves, or the door. Use furniture or temporary barriers to block reflective paths.

TroyStudio Portable Vocal Booth, Large Foldable Microphone Isolation Shield, Music Recording Studio Sound Echo Absorbing Box, Desk & Stand Use Reflection Filter with Thickened Dense Acoustic Foam
【BASIC INFO】: Inside size after setup: 8'' (L) X 10'' (W) X 12'' (H), large space for various...
As an affiliate, we earn on qualifying purchases.
As an affiliate, we earn on qualifying purchases.
How to Use Acoustic Dampening to Tame Echo and Low-End Buildup
Acoustic dampening in a closet is about breaking up reflections and controlling bass. Thick panels, rugs, and moving blankets absorb sound waves and prevent them from bouncing endlessly.
Place bass traps in the corners where low frequencies tend to gather. Use foam panels at reflection points—behind the mic and on the ceiling—to soften echo. Cover hard surfaces like doors and shelves with soft materials to keep sound from bouncing around.
For instance, layering a moving blanket over the door or around the closet’s opening can reduce sound leakage and reflection, while thick carpet or foam in the floor absorbs flutter echoes.

8 Pack - Bass Traps Acoustic Foam Corner, 8''x8''x12'' Black Bass Traps Corner Studio Foam, High Density and Fire-Proof Acoustic Panels Recording Studio Acoustical Treatments
Acoustic Principle- Bass Trap is a kind of sound absorbing structure specially used to absorb specific low-frequency standing...
As an affiliate, we earn on qualifying purchases.
As an affiliate, we earn on qualifying purchases.
Where to Place Absorption Panels for Maximum Effect
In a tiny closet, placement is everything. Focus on reflection points: behind you, the sides, and the ceiling. Use a mirror to find where sound bounces back—any spot where you see your reflection is a reflection point.
Position foam panels or blankets at these spots to reduce brightness and echo. Don’t forget the corners: bass traps or dense panels here prevent low-frequency buildup, which often causes muddiness in recordings.
For example, a typical setup might involve a panel behind your mic, a couple on the side walls, and a bass trap in each corner—covering about 50-70% of reflective surfaces makes a noticeable difference.

Ehiair 8 Inch Upgraded Shutter Exhaust Fan with Thermostat & Remote Control, Automatic On/Off by Temperature, 760 CFM Wall Mounted Garage Fan for Attic, Greenhouses, Sheds, Chicken Coops & Shops
【Powerful Ventilation】- Ehiair 8-inch shutter exhaust fan delivers a strong 760 CFM airflow to quickly remove heat, humidity,...
As an affiliate, we earn on qualifying purchases.
As an affiliate, we earn on qualifying purchases.
Treat the Door and Gaps — Don’t Let Sound Leak or Reflect
The door is usually the biggest weak point in a closet studio. Gaps around the door let sound escape or enter, causing leakage and reducing the effectiveness of your treatment.
Seal cracks with weatherstripping or acoustic sealant. Hang a thick blanket or moveable panel over the door when recording. This not only muffles sound but also prevents reflections bouncing into your mic.
For example, a common trick is to hang a moving blanket on the door with bungee cords or hooks, creating a quick and cheap barrier that improves sound isolation.
Floor and Ceiling: Overlooked but Critical for Clear Sound
Floors and ceilings often get neglected, but they play a big role in small-room acoustics. Hard floors reflect sound, creating flutter echo; ceilings can do the same.
Lay down a thick rug or foam tiles on the floor. Use ceiling-mounted acoustic panels or DIY cloud traps to absorb overhead reflections. These simple steps prevent sound from bouncing back and forth.
In practice, laying a dense carpet or foam mat reduces echo, making your recordings warmer and clearer. Overhead treatments can be as simple as foam tiles or hanging blankets from the ceiling grid.
Choosing the Right Mic and How It Interacts with Your Space
The microphone you pick can make or break your closet setup. A hyper-cardioid or shotgun mic picks up less room noise, making it ideal in small spaces. Conversely, a condenser with a wide pickup pattern will capture more reflections and room tone.
For example, a dynamic mic like the Shure SM58 works well in untreated closets because it’s less sensitive to room sound. A shotgun mic can isolate vocals even in a less-than-ideal environment.
Matching your mic to your space minimizes the need for excessive treatment and saves money.
Ventilation and Heat: Keep Your Closet Cool and Quiet
Putting a hot, powerful computer or audio gear in a closet means heat buildup. Without proper ventilation, temperatures can skyrocket, and your equipment will throttle or shut down.
Use active ventilation—quiet exhaust fans, vents, or ducted airflow—to move hot air out. Don’t fully seal the space unless you include temperature-controlled fans or cooling systems, like a dedicated duct or an AIO liquid cooler.
For example, a simple setup might involve a small fan pulling air out of the top corner of the closet, with a passive vent in the door. For more serious setups, consider an engineered soundproof cabinet with ducting and an exhaust fan [2][3].
DIY or Buy? Which Approach Fits Your Budget and Needs?
DIY solutions like moving blankets, rugs, and foam panels are cheap, quick, and effective for small budgets. They’re ideal if you’re just starting out or renting.
Investing in purpose-built soundproof booths or sealed cabinets offers better isolation and cooling but costs more. These are great if you need professional-grade sound or plan to record frequently.
For example, a budget setup might include blankets, a few foam panels, and sealing gaps, totaling less than $200. A higher-end, custom booth can cost over $1,000 but provides a cleaner, more controlled environment.
Frequently Asked Questions
Is acoustic dampening the same as soundproofing?
Not quite. Acoustic dampening reduces echo and reflections inside a space, making it sound better. Soundproofing blocks sound from leaving or entering, which is much harder and more expensive — especially in small closets.What is the best place to put foam or panels in a closet booth?
Focus on reflection points: behind the microphone, the ceiling, and the walls facing the mic. Corners need dense bass traps to control low-end buildup. Use a mirror trick to find where sound bounces back.Do I need bass traps in a small closet?
Yes. Even in tiny spaces, low frequencies tend to gather in corners, creating muddiness. Bass traps or dense panels in the corners help even out the sound and add clarity.Should I treat the door, walls, ceiling, or floor first?
Start with the reflection points around your microphone—walls and ceiling. Then address the door gaps with sealing or blankets. Floors come last, with rugs or foam to prevent flutter echo.How much treatment is enough for a vocal booth?
At least 50-70% coverage of reflective surfaces with foam or panels. Focus on corners and the primary reflection points. Too much can deaden sound, so balance is key.Conclusion
Transforming a closet into a recording or gaming space is all about smart placement, targeted treatment, and keeping your gear cool. Don’t just buy foam — think about how sound moves, where it reflects, and how to block or absorb it effectively.
With the right tweaks, your tiny closet can deliver big sound quality. So go ahead — treat your space like a pro, and enjoy recordings or streams that sound crystal clear, without the noise or heat.